Background and History:
I have this Asus Xtion Pro Live device for 3D scanning( ASUS Xtion PRO LIVE ) and like the Microsoft Kinect it has the PrimeSense sensors in it to do its magic. I don’t know if it was before or after the Adafruit team put up a $3000 bounty for open source drivers( Adafruit $3k driver bounty ) but PrimeSense became a big part of using these sensors in open source projects. They created the OpenNI project for a developers programming interface to the devices and lots of other projects sprang up and around that. This was only a few years ago since the Adafruit open source driver bounty in 2010. PrimeSense was very active in the open source space for software using their hardware right up until Apple purchased them in late 2013( Apple acquires PrimeSense ). That’s when the PrimeSense projects disappeared from the Internet and now we’re directed to dead Apple.com pages. I mention all this because it has become more and difficult to find the software to get things working. Even the RGBDemo software has been stale over the past few years when the authors started their own company to use the technology and techniques of RGBDemo in the Scannect application and were soon bought out( Skanect by Occipital ). What this means is while RGBDemo runs on Linux, Skanect does not.
Getting RGBDemo Installed:
I installed RGBDemo on my Ubuntu 14.04 laptop after lots of fits and starts with finding and building various software packages but when I tried scanning a soup can, I was getting what looked more like a pinwheel instead of a smooth round cylinder.

I used this blog( Creating 3D mesh models using Asus xtion with RGBDemo and Meshlab on Ubuntu 12.04 ) as a guide to getting it running. When I couldn’t figure out what was causing my strange pinwheel rotation effect I started posting to various forums on RGBDemo but the author of the guide was the only one who got back to me promptly. It was offered as an idea to try a MS Kinect to see if it might be a device problem but I don’t have one so I thought I’d try going back to the software. Instead of messing what what is now almost working I wanted another way to test on the same laptop and the Docker( What is Docker ) software container mechanism seemed like a good way to go. I’d only heard of Docker so I had to get up on it first before attempting to rebuild the RGBDemo software stack. Running Ubuntu I just found a few web sites talking about installing docker and ran through the simple steps of installing it via the built-in software installation mechanism called APT(apt-get). The steps to install docker went like this:
- sudo apt-key adv –keyserver hkp://keyserver.ubuntu.com:80 –recv-keys 36A1D7869245C8950F966E92D8576A8BA88D21E9
- sudo sh -c “echo deb https://get.docker.com/ubuntu docker main > /etc/apt/sources.list.d/docker.list”
- sudo apt-get update
- sudo apt-get -s install lxc-docker
With Docker installed I had to learn how to create containers for software and it turns out there are default containers with base installations of Linux(both Debian and Ubuntu ). So I practiced a few and created a Debian base image and a Ubuntu based image. The easiest way to work with Docker is to create a directory with a little file name Dockerfile. In the Dockerfile you put commands for the building and configuration of the container you want to run. Here is my Ubuntu xterm Dockerfile:
- FROM ubuntu
- RUN apt-get update \
- && apt-get install -qqy \
- x11-apps \
- xterm
- ENV DISPLAY :0
- CMD xterm
I build the container running this command in the directory with the Dockerfile file:
- sudo docker build -t ubuntu/xterm .
Where build is the command to build the container, -t is the flag to set the tag name and the “.” tells docker to look in the current director for a file named Dockerfile.
When it’s done, we can see if the container image was created with this command:
- sudo docker images
You’ll get something like this:
REPOSITORY TAG IMAGE ID CREATED VIRTUAL SIZE
ubuntu/xterm latest f70d4af79db0 27 hours ago 226.3 MB
Running the image and getting a running container goes like this:
- sudo docker run -v /tmp/.X11-unix/X0:/tmp.X11-unix/X0 ubuntu/xterm
The -v options tell the container to like the host directory( /tmp/.X11-unix/X0 ) with the same directory inside he container. This is so I can run X11 apps in the container and have their display show up with all my other applications on Ubuntu.
Now an easier way to do it is to create one file( a script file ) which has all the command in them so it’s quick and easy to run the container.
- #!/bin/bash
- CONTAINER=”ubuntu/xterm”
- #create the container using the Docker File Dockerfile
- #it’s based on the default ubuntu container
- #
- sudo docker build -t $CONTAINER .
- # create the var to pass to docker linking host file X0 to container file X0
- XSOCK=/tmp/.X11-unix/X0
- # run the xterm xapp container
- sudo docker run -v $XSOCK:$XSOCK $CONTAINER
I’ve created some code to test if the image exists or not and if not to run the build process otherwise just run the image and create a running container. I’ll show that in the RGBDemo example. This learning experience took a couple of hours since it was tricker getting X11 applications running than just getting a container up and running with a BASH login. Which BTW if you change the “xterm” at the end of the Dockerfile file to “bash” will get you directly into the bash interpreter in the terminal window you start the container with.
So now it’s time to get RGBDemo running and again I went back to the previous blog to step through the packages needed. But this time I noticed the mentioning of ROS package being used for the PCL pages and it got me thinking that I should try loading as many required packages from ROS since they use these sensors for robot vision so they should be fewer conflicts between packages and versions. I’d deal with compatibility with RGBDemo later. By the way, ROS stands for Robot OS( About ROS ) and is a software stack for robot control and communications between robots and/or robot components. I was able to pick my way through the process of ROS packages to get all the parts needed and it really came down to two ROS packages, the ros-indigo-perception-pcl and ros-indigo-vision-opencv packages. OpenNI came along for the ride and once these and the supporting packages were loaded I eventually was able to get the NiViewer application to show data from the Asus xtion Pro Live device. But nothing else seemed to work and I could not find the NiTE package I had installed on my laptop. Copying my NiTE include and library files didn’t help so I got on the Internet and searched some more. That’s when I found a Russian web site with all the old PrimeSense software linked on it and there was the 64 bit Linux version of NiTE. I got it in the container and installed it and BANG, all my apps were now working.What was even better was getting RGBDemo on the container, patching it and then running the build script went without a hitch. I was nervous to look in the rgbdemo/build/bin directory but when I did there were all the executable tools and they all worked!
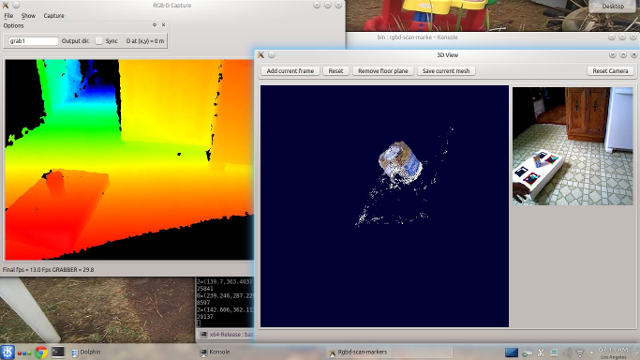
Unfortunately, the problem I originally had with the soup can scanning like it was a pinwheel didn’t change. But in playing with it I zoomed into the initial scan( no retation of the model yet ) and I saw the soup can label was partially showing on the floor. The label is only on the can so with it showing on the floor that means the rgb sensor/camera was not calibrated with the IR sensor so I’m feeling confident that a calibration of the scanner should fix my problem.

To create this image I not only created the rgbdemo directory for the Docker files, I also created a “resources” director which will hold the downloaded NiTE installation software. It’s not in any repository and I figure downloading it inside the container might be wasteful so it’s done in the buid/run script and stored in the resources directory. It took me some time learning how Docker handles things like loading files from the host filesystem and how the “ADD” command in the Dockerfile with automatically extract a compressed file. So my directory heirarchy goes like this:
rgbdemo/
doit-openni
Dockerfile
resources/
NITE-Bin-Linux-x64-v1.5.2.23.tar.bz2
The Docker files to create the RGBDemo container:
Dockerfile:
FROM ubuntu# quiets down mesg to console about TERM not being setENV TERM linuxRUN apt-get update \&& apt-get install -qqy \openssh-client \wget \git \gawk \libusb-1.0-0-dev \freeglut3-dev \openjdk-7-jdk \doxygen \graphviz \software-properties-common \cmake build-essential \xterm# getting ROS packages because they contain all the openni,opencv/pcl goodness neededRUN sh -c ‘echo “deb http://packages.ros.org/ros/ubuntu trusty main” > /etc/apt/sources.list.d/ros-latest.list’RUN wget http://packages.ros.org/ros.key -O – | apt-key add –RUN apt-get update \&& apt-get install -qqy \ros-indigo-perception-pcl \ros-indigo-vision-opencv# Sample-NiHandTracker does not work so I was attempting to use libfreenect# libfreenect drivers are what’s used on the laptop which works# complains: GestureGenerator.Viewer init failed#RUN apt-get install -qqy ros-indigo-libfreenect##libfreenect-demos# copied my NiTE directories into the container to satisfy build complaints#scp -r x@X:/usr/include/nite /usr/include#scp -r x@X:/usr/lib/libXnNite* /usr/libRUN add-apt-repository –yes ppa:xqms/opencv-nonfreeRUN apt-get update \&& apt-get install -qqy \libopencv-nonfree-dev# if UsbInterface is commented out, remove the comment char and flag(DJL) as changedRUN sed -i ‘/;UsbInterface=2/c\UsbInterface=2;DJL’ /etc/openni/GlobalDefaults.ini# install NiTE middlewareADD resources/NITE-Bin-Linux-x64-v1.5.2.23.tar.bz2 /tmpRUN cd /tmp/NITE-Bin-Dev-Linux-x64-v1.5.2.23 \&& ./install.shRUN rm -rf /tmp/NITE-Bin-Dev-Linux-x64-v1.5.2.23# OLD way of getting the ZIP file from the Internet# && unzip NITE-Bin-Linux-x64-v1.5.2.23.tar.zip \# && rm NITE-Bin-Linux-x64-v1.5.2.23.tar.zip \# && tar -xf NITE-Bin-Linux-x64-v1.5.2.23.tar.bz2 -C /tmp#RUN cd /tmp/NITE-Bin-Dev-Linux-x64-v1.5.2.23 \# && ./install.sh#RUN rm -rf /tmp/NITE-Bin-Dev-Linux-x64-v1.5.2.23 /tmp/NITE-Bin-Dev-Linux-x64-v1.5.2.23.tar.bz2# get rgbdemoRUN cd /root \&& git clone –recursive https://github.com/rgbdemo/rgbdemo.gitRUN cd /root/rgbdemo \# fix linux_configure.h to use OpenNI not OpenNI2&& sed -i ‘/\$\*/i\ -DNESTK_USE_OPENNI2=0 \\’ linux_configure.sh \#edit scan_markers/ModelAcquisitionWindow.cpp, comment out line 57,58,59,60,61&& cd scan-markers \&& gawk ‘/if \(!m_controller/, c==4 {$0 = “//” $0; c++} { print }’ ModelAcquisitionWindow.cpp > /tmp/tmpfile \&& cp /tmp/tmpfile ModelAcquisitionWindow.cpp# get rules.d file#/etc/udev/rules.d/55-primesense-usb.rulesENV DISPLAY :0ENV QT_X11_NO_MITSHM 1CMD xterm#CMD NiViewer
The build/run script:
#!/bin/bashmkdir -p resourcesif [ ! -e resources/NITE-Bin-Linux-x64-v1.5.2.23.tar.bz2 ]thenecho “doesn’t Exist bz2”if [ ! -e resources/NITE-Bin-Linux-x64-v1.5.2.23.tar.zip ]thenecho “doesnt Exist zip”fiecho “unzip and remove zip”unzip NITE-Bin-Linux-x64-v1.5.2.23.tar.zip -d resourcesrm -rf unzip NITE-Bin-Linux-x64-v1.5.2.23.tar.zip# Final check to make sure we have the NiTE installation fileif [ ! -e resources/NITE-Bin-Linux-x64-v1.5.2.23.tar.bz2 ]thenecho “ERROR: NiTE install file doesn’t exist…. EXIT!”exitfifiCONTAINER=”rgbdemo/openni”RUNNING=$(sudo docker inspect –format=”{{ .State.Running }}” $CONTAINER 2> /dev/null)if [ $? -eq 1 ]; thenecho “$CONTAINER does not exist.”echo “creating $CONTAINER.”#create the container using the Docker File debDockerFile-xterm#it’s based on the default debian container#sudo docker build -t rgbdemo/openni .fi# create the var to pass to docker linking host file X0 to container file X0XSOCK=/tmp/.X11-unix/X0VBUS=/dev/bus/usb# run the xterm xapp container# -i keeps stdin open# -t creates a psuedo ttysudo docker run –privileged -v $XSOCK:$XSOCK -v $VBUS:$VBUS $CONTAINER
